Moving Your WordPress Install to a New Host
Background:
I finally took the plunge to upgrade this site to WP 2.8 after noticing that WordPress continued to not play nice with 1&1. Then again maybe I should say that 1&1 never played well with WordPress. I’ve covered some issues with 1&1 that included the scary 1&1 Error 500 issue as well as having to force enable PHP5 for 1&1 but once going to WP 2.8, a lot of things broke and it was due to the php.ini memory issue due to a cap by 1&1.
In looking for a new host, I decided to finally try HostGator as many people have had a great experience with them. In regards to WordPress, HostGator seems liked a good fit. 1&1 will allow a max of 20m of php memory to your php.ini while HostGator allows up to 64m of php memory, that’s a huge plus right there, throw in unlimited SQL databases and I was sold. Both 1&1 and HostGator offer larger php.ini memory options for dedicated servers but in this case we are dealing with shared servers. So let’s go ahead and outline the process of moving your database and WordPress install to a new host.
Getting Ready. Backup, Backup, Backup!
Since we are going to be moving a complete WordPress install along with the database we will essentially be creating a mirror copy of the install and database, the only significant change will be changes to your wp-config.php file since your site will have a new database name, user and password.
FTP to your current site and download all your site files and WordPress files to a site folder on your hard drive. If your WordPress install has a caching plugin, you may wish to deactivate it and not copy the cache files as there will be many.
Log into your WordPress installation and export all of your posts, pages, comments, customs fields, tags via the Tools>>>Export option, this will create a XML file of all your content, keep this in a safe place.
Next up may be the scary part for some people, you will need to access your database via phpMyAdmin. In here you will be able to export all of your WordPress tables.
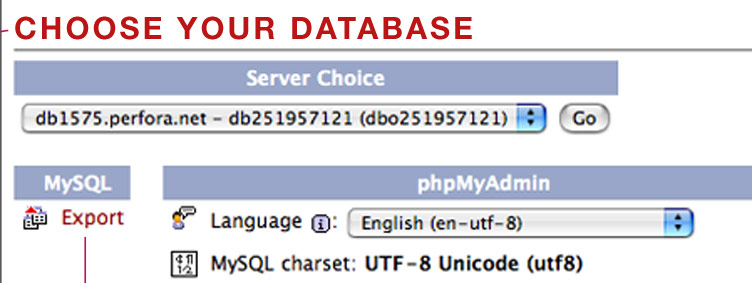
If you have more than one database you may be presented with something similar in which you can choose between all of your databases. Here you want to make sure that you do not click export just yet, you want to open your WordPress database to be able to see all of the tables containing all your content. Click on your database name.

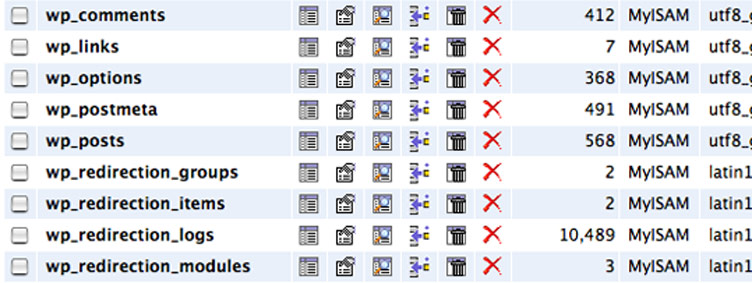
Once you click on your database name you will be presented with all of your WordPress tables, your may look different due to using a custom prefix or certain plugins utilizing your database but it will be similar to the one below. At this point you will be ready to export via the tab towards the top of the page.

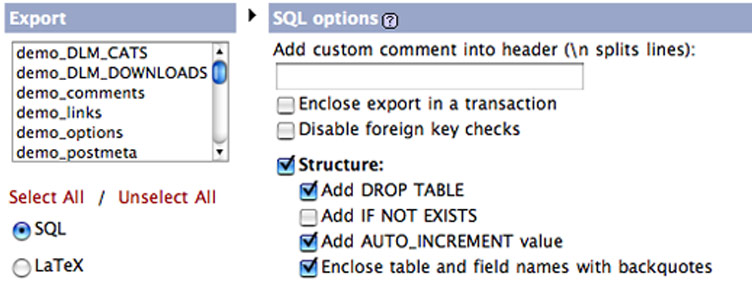
You will now be at the export page, here you will be able to see all of the WordPress tables in the selection box that you will be exporting along some checkbox’s that need to be marked off.
In the SQL section
Check the following boxes:
‘Structure’
‘Add DROP TABLE’
‘Add AUTO_INCREMENT’ and
‘Enclose table and field names with backquotes’
In the data section check off the the “Data” selection box and the rest can be left blank.
Once you are ready, check off save and click go! Depending on the size of your database this may take some time to do a full export.

Importing Your Old Data to Your New Database
1.) Create a new WordPress install with a new database
2.) Log in to phpMyAdmin and select your new database
3.) Click on “Select All” to check off the boxes on all your tables
4.) There should be a dropdown option area, select “Drop or Drop Tables”
5.) Click “Yes” if it asks you if you are sure you wish to “Drop the Tables”
6.) With an empty database now navigate to “Import”
7.) Select your old database export file and import it into your new WordPress database
8.) Now that you have your post content in your new database it’s time to move all of your uploaded pics, themes, plugins over. Via FTP upload your files to your new server.
If there is any confusion please visit the WordPress Codex page on Backing Up Your Database